|
|
|
Two Courses and Two Different Spirits in Two
Different Locations
We invite you to visit our two extra ordinaries courses,
Bumi Serpong Damai (BSD) course,
designed by
Jack Nicklaus, and Pantai Indah Kapuk (PIK) course, designed
by Robert Trent Jones Jr.
|
New Page 1
|
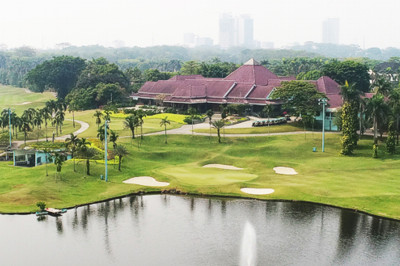
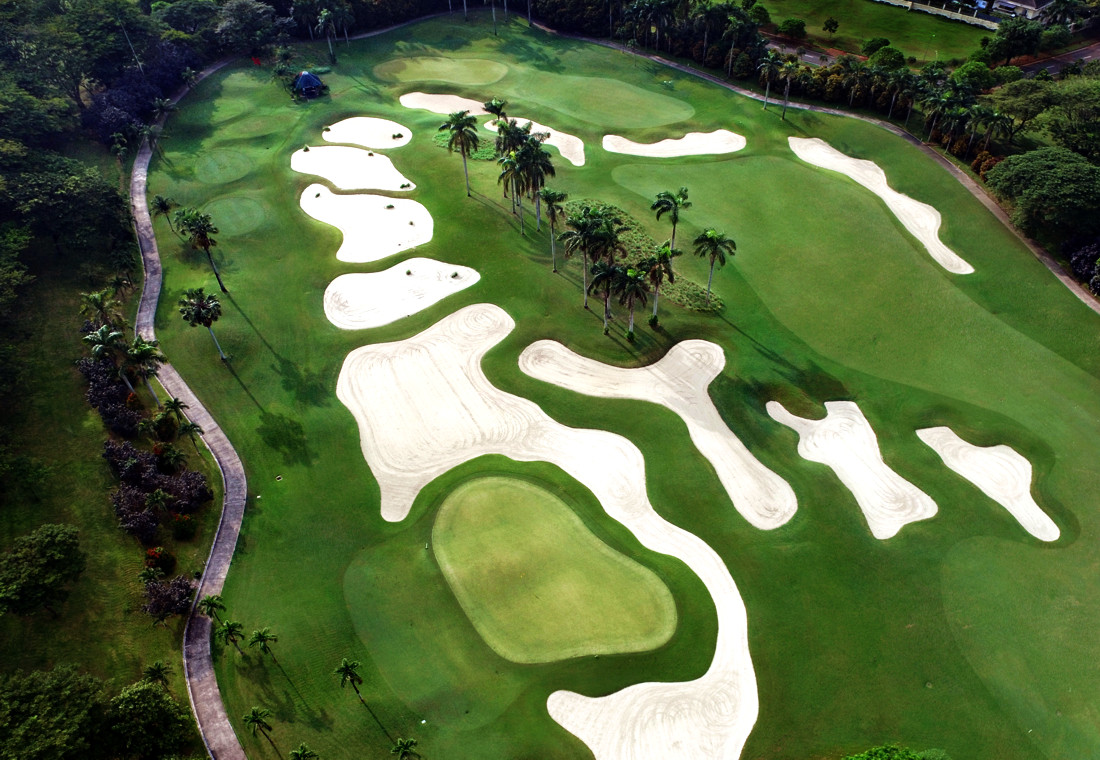
Our Courses
Bumi Serpong Damai (BSD) Course
Bumi
Serpong Damai (BSD) Course has been designed to offer an
enjoyable mental challenge within a visually appealing setting
with every hole positioned within beautifully landscape
settings. As Jack Nicklaus's maiden project in Indonesia, he
ensured this remarkable 6,545-meter, par 72 course incorporated
many of his personal favorite features from some of the world's
top courses. The Bumi Serpong Damai (BSD) Course is undisputably
one of the best the world has to offer.
In addition to the golf course, members and their guests will be
able to dine at the clubhouse which boasts fantastic views of
the course, swim in an Olympic-size pool, play tennis on indoor
and outdoor courts, or hone their golf game at the practice
facility (complete with driving range, practice green, practice
bunker and chipping green).
 "There
is no single 'correct approach' on most holes. Instead,
there are many possible solutions, so that the course
remains fresh and exciting each time you step up to the
first tee. My hope is that members who play regularly
will gradually move back their tee shots, and let the
course grow with their game. In this way, the "Spirit of
the Hills" will always be as fresh and exciting as the
first time they play the course." "There
is no single 'correct approach' on most holes. Instead,
there are many possible solutions, so that the course
remains fresh and exciting each time you step up to the
first tee. My hope is that members who play regularly
will gradually move back their tee shots, and let the
course grow with their game. In this way, the "Spirit of
the Hills" will always be as fresh and exciting as the
first time they play the course."
----- Jack Niklaus
|
|
|
|
|
BSD
Course Characteristic |
|
HOLE 1 |
 |
382m Par 4
This par four is a good medium length par 4.
Beware of the long sandy waste bunker alongside
the right side of the fairway. Too conservative
a tee shot to the left side of the fairway will
give the golfer a clean but awkward lie due to
the � catchers mitts� guarding the left side of
the fairway. The second shot into the
medium-sized green is fairly straight-forward.
Avoiding the three bunkers leading up to the
green is really the only difficult hazard to bew
|
|
|
|
HOLE 2 |
 |
407m Par 4
After getting off to a quick start on the
first hole, two long, precise shots are required
for a two putt part on #2. The ample width of
the fairway will allow the golfer to let out the
shaft on the tee shot, but favor the right side
of the fairway to avoid the two fairway bunkers
to the left of the landing area. This will leave
a good view and angle into the green. A bunker
guards the right side of the green, but a
careless shot to the left side of the green
could create a testy little pitch due to the
numerous lows to the left of the green.
|
|
|
|
|
|
|
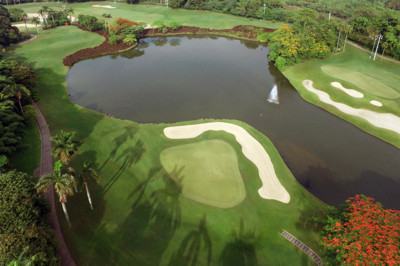
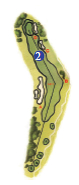
HOLE 3 |
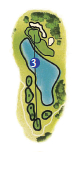 |
174m Par 3
We have now reached the first of our par
3�s. When playing this medium-length par 3 the
golfer needs to make sure he has plenty of club
to hit over the water but not too much club
where the bunker behind the green may catch a
ball hit too far. Ample fairway is provided
short and to the right of the green, but too
cautious a shot may find another bunker short
right of the green.
|
|
|
|
HOLE 4 |
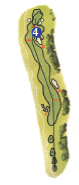 |
485m Par 5
# 4 is only the first of the four very
interesting par 5�s. From the tee, the golfer
must make a decision. �Should i play a safe shot
to the right side of the fairway, away from the
frightening bunkers and hollows to the left, or
should i take a gamble and try to hit a big
drive over them and be rewarded with a shorter,
easier angle into the green for a possible two
putt birdie?�. If the golfer makes the safe
choice, then an accurate second shot is required
to position the golfer for the easiest angle for
the third shot into the green. Whatever the
golfer chooses, #4 should prove to be a very
eventful and unforgettable hole.
|
|
|
|
|
|
|
HOLE 5 |
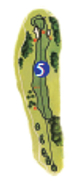 |
398m Par 4
A long, straight drive is required to
dissect the two large waste bunkers guarding
both sides of the fairway. Like wisw, a long
accurate second shot is needed to hit the green
while avoiding the three bunkers surrounding it.
|
|
|
|
HOLE 6 |
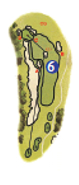 |
292m Par 4
A Tricky short part 4 awaits the golfer at
#6. The more the golfer gambles and succeeds,
the bigger the reward, but if the gamble is
lost, a for sure bogey or more awaits. The
gamble is to try to hit a big drive down the
left side of the fairway while avoiding the deep
pot bunker in the center of the fairway and the
large waste bunker to the left. If the golfer is
successfull then a two putt birdie, or the rare
one putt eagle, is possible. If the gamble fails
numerous hazards lurk, so that a double bogey
could be a welcome score. The consevative way to
play the hole is to hit a fairway wood or along
iron off the tee, leaving a short iron or wedge
to the green.
|
|
|
|
|
|
|
HOLE 7 |
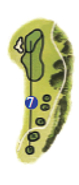 |
158m Par 3
Multiple tees allow the golfer a variety of
yardage to play to this exceptionally beautiful
green setting.The green site 15 meters above the
Cisadane River brings to mind famous green
setting one would except to see along the coast
of California instead of Indonesia. Don�t let
the beauty of this hole distract you too much
because there are plenty of hazards around the
green that could quickly subdue one�s mood.
|
|
|
|
HOLE 8 |
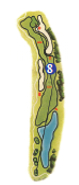 |
491m Par 5
The second of the par 5�s, #8 requires a
well-placed drive.Beware of the water guarding
the right side of the fairway on the tee shot. A
drive played too cautiously to the left will
leave a long second shot over a long sandy waste
bunker along the left side of the fairway and
the crossing in front of the second landing
area. The best tee shot will be played down the
right side so that the ideal second shot can be
played to the left side of the fairway or
possibly hit to the green if the drive is long
enough. The green is convex-shaped in the front
with the back half draining right to left.
Therefore, the third shot, if hit from right of
center, will be difficult to hold.
|
|
|
|
|
|
|
HOLE 9 |
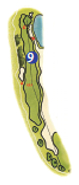 |
414m Par 4
The is a long, difficult par 4. Offthe tee
beware of the sandy waste bunker to the right.
Due to the length of the hole, the golfer will
want to hit the tee shot long, and down the left
side of the fairway to be able to hit into the
full depth of the green for the second shot.
Beware of the fairway bunker that guards againts
a ball hit too far to the left off of the tee.
The large green offers a good target for a
fairway wood or long iron into the green. The
green is well protected by a bunker in front,
water to the right, and more sand behind. The
only safe alternative to a shot hit directly at
the green is to the left.
|
|
|
|
HOLE 10 |
 |
409m Par 4
A long carry over water is required for a
tee shot hit toward the center of the fairway. A
large bunker guards the left side of the landing
area while the first half of the fairway, a
strip angling from right to left, is well
protected by three bunkers. The second shot is a
straightforward one to the green. A large sandy
waste to the backside of the green awaits any
shot hit long or left of the green. A delicate
little pitch out of a grassy hollow awaits a
shot hit right of the green.
|
|
|
|
|
|
|
HOLE 11 |
 |
184m Par 3
This medium length par 3 is the best played
by fading the ball off the tee to the green. The
golfer must negotiate the water and the sand
bunker surrounding the left half of the green. A
ball fading too much will find a shallow grassy
hollow awaiting. This is a hole where there will
be a lot of birdies, but also a lot of high
numbers.
|
|
|
|
HOLE 12 |
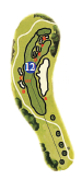 |
377m Par 4
Avoid the sand bunkers on either side of the
fairway off the tee. The second shot into the
green will be an interesting one. Feel, more
than strategy and technique, is the premium for
this shot. The green is elevated so that the
putting surface is blind to the golfer from the
landing area. The only part of the green that is
visible is the false fronts at the front of the
green and the flashes at the back. Therefore,
even though the actual putting surface is not
visible, the golfer can still gauge the depth of
the green.
|
|
|
|
|
|
|
HOLE 13 |
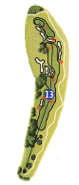 |
518m Par 5
This is the type of par 5 that can play very
simply or it can be like a row of dominoes. One
mistake can trigger one disaster after another.
The drive is a simple one; just avoid the two
fairway bunkers guarding the left side of the
landing area. If the second shot is hit from the
fairway, the first set of cross bunkers should
not be difficult to carry. If the drive finds
one of the fairways bunkers, then the cross
bunkers can became a frightening hazard. This
same situation accurs for the third shot. The
green is a relatively simple target from the
fairway, and the cross waste bunker short of the
green should not cause a problem when hitting
the green. The cross waste bunker can be
hazardous if the golfer is trying to hit over it
from the first set of cross bunkers, or is
trying to hit out of it to the green. Therefore,
if anywhere during the hole the golfer ends up
in a fairway bunker, he might want to consider
chipping out short, and taking his chances for a
sure bogey instead of trying a heroic shot to
save par.
|
|
|
|
HOLE 14 |
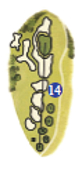 |
175m Par 3
Here is a unique par 3. Basically, it is an
island green in a sea of sand. The large green
is an ample target to hit to, but any stray
shots, whether short, long, right or left, will
require a sandy to make par.
|
|
|
|
|
|
|
HOLE 15 |
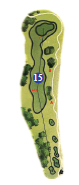 |
389m Par 4
After having to negotiate sand and water
through the first 14 holes, the golfer will
immediately notice that there is no sand or
water on this hole. The golfer should not let
down his guard though, because there are many
subtle treacheries that could wreak havoc with a
golfer�s score.
The golfer needs to avoid the large grassy
hollow alongside the right side of the fairway.
�Catchcers mitts� will snare any tee balls hit
too far to the left avoiding the grassy hollow
to the right or while trying to reach the part
of the fairway offering the best angle into the
green.
The convex green sits on top of a hill. A
crisply struck, spinning fade is the best shot
for holding this green. Closely mowed fairway
surrounds all but the right side of the green.
Therefore, a shot missing the green or rolling
of it will result in a multioptional chip shot
to get the ball up and down for par.
|
|
|
|
HOLE 16 |
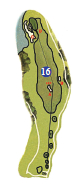 |
426m Par 4
A spectacular view awaits the golfer from
the tee on this hole. A multilevel double
fairway lies in front of the golfer with a view
through the lower fairway, across the water and
sand, to the green. If the golfer chooses this
route, he will be left with a shorter shot to
the green, but a more difficult angle. If the
upper fairway is the choosen route, a longer
shot to the green is required, but the angle to
the green is easier. Avoid hitting left of the
green because there is a large waste bunker
there to grab and balls and any shots hit left
of it will find a lake.
|
|
|
|
|
|
|
HOLE 17 |
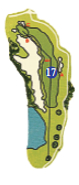 |
360m Par 4
An ocean of sand awaits any shots hit too
far to the left.From the tee, the best shot is
to get as close to the waste bunker as possible
without going in. This allows for the shortest
shot and best angle into the green. A careless
shot hit too far to the right may find the
bunker guarding the right side.
The key to the hole is avoiding the waste
bunker. for the short hitter, the fairways works
all the way arround the right side of it so no
one has to play over it if they decide not to.
|
|
|
|
HOLE 18 |
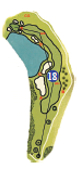 |
490m Par 5
This is a hole where a golf tournament or
match will more likely be lost than won. From
the tee, while looking across sand, water and
into the green, the golfer will be tempted to
hit a big drive so as to be able to strike his
second shot over the water to the green. The
cautious route in playing the hole will take the
golfer around the lake, but multiple bunkers and
water around the green will even make the third
shot a little frightening. A score of 5 on this
hole will be a good score that will win a match
more times than not.
|
|
|
|
Hole |
1 |
2 |
3 |
4 |
5 |
6 |
7 |
8 |
9 |
OUT |
|
Par
|
4 |
4 |
3 |
5 |
4 |
4 |
3 |
5 |
4 |
36 |
|
Index |
8 |
4 |
10 |
14 |
12 |
18 |
16 |
6 |
2 |
|
|
Black Tee |
382 |
407 |
177 |
485 |
398 |
292 |
158 |
491 |
414 |
3.204 |
|
Blue Tee |
360 |
388 |
152 |
463 |
373 |
282 |
140 |
461 |
398 |
3.017 |
|
White Tee
|
339 |
369 |
132 |
453 |
346 |
263 |
119 |
430 |
376 |
2.827 |
|
Red Tee |
308 |
330 |
111 |
442 |
314 |
235 |
99 |
420 |
349 |
2.608 |
|
Yellow Tee
|
276 |
283 |
89 |
394 |
278 |
210 |
88 |
392 |
290 |
2.300 |
|
|
Hole |
10 |
11 |
12 |
13 |
14 |
15 |
16 |
17 |
18 |
IN |
TOTAL |
|
Par
|
4 |
3 |
4 |
5 |
3 |
4 |
4 |
4 |
5 |
36 |
72 |
|
Index |
3 |
5 |
11 |
9 |
17 |
7 |
1 |
15 |
13 |
|
|
|
Black Tee |
409 |
184 |
377 |
518 |
175 |
389 |
439 |
360 |
490 |
3341 |
6.545 |
|
Blue Tee |
389 |
170 |
359 |
496 |
162 |
372 |
406 |
325 |
473 |
3.152 |
6.169 |
|
White Tee
|
364 |
149 |
336 |
466 |
147 |
347 |
379 |
305 |
449 |
2.942 |
5.769 |
|
Red Tee |
332 |
150 |
306 |
411 |
137 |
316 |
348 |
280 |
375 |
2.624 |
5.232 |
|
Yellow Tee
|
278 |
127 |
259 |
390 |
116 |
270 |
301 |
241 |
328 |
2.300 |
4.600 |
|
|
|
 |
| |
|
PT. Damai Indah Golf Tbk. |
Jl.Bukit Golf I, Sektor VI
Bumi Serpong Damai,
Serpong ,Kota Tangerang Selatan
Banten
|
|
|
|
|
|
|